Features
Fujifilm Instax Mini Link Guide: How To Print New Pokémon Snap and Nintendo Switch Photos
For those with an Instax Mini Link and looking to print some Nintendo Switch screenshots this is a simple five-step guide and some tips to make physical Fujifilm photos…

With the return of the photographic adventure game that is New Pokémon Snap, it was only appropriate for Nintendo and The Pokémon Company to once again team up with someone who could get players’ digital photos printed into the realm of tangible material. While you may not be able to walk on over to a local Blockbuster kiosk with your Nintendo 64 Cartridge in hand and get some pictures of Pokémon printed, Fujifilm is helping Nintendo and The Pokémon Company provide players with recreating some old childhood memories and new ways to frame. For those of you who have picked up an Instax Mini Link and are looking to print some of your Nintendo Switch screenshots from New Pokémon Snap, Animal Crossing: New Horizons, or whatever game you love and want on a wall or in a scrapbook, this is a simple five-step guide to make some gaming Fujifilm photos with the device.
Step 1: Load That Film!

After unboxing your Fujifilm Instax Mini Link — and before possibly sliding it into that adorable special edition Pikachu silicon case it might have come with, make sure to load up an Instax Film Pack into your unit’s cartridge slot. By holding the circular nub to the right on the back of the device, you can carefully raise the cartridge film door cover — be sure not to yank it though! Insert your Film Pack into the device by aligning the yellow bar that can be seen on the top side of the cartridge slot. After closing the cartridge door, the Instax Mini Link device should turn on and print (or rather reject) a black test slip. When this black film cover comes out of the print end of the unit, your device is ready to be used. This process should instantaneously occur upon closing the cartridge film door.
For those curious about charging the Instax Mini Link before initial usage, do not be worried as the device actually comes partially pre-charged out of the packaging. However, it should be noted that it is only at about less than 20% capacity. There is obviously no harm in plugging it in for an hour before proceeding any further, but if you are anxious to print some of your Pokémon or Animal Crossing villagers and do not currently have access to a USB charger then go on ahead and move forward (but really get it hooked up since the next few steps before you print require you to use only your phone and Nintendo Switch)!
Step 2: Download The App
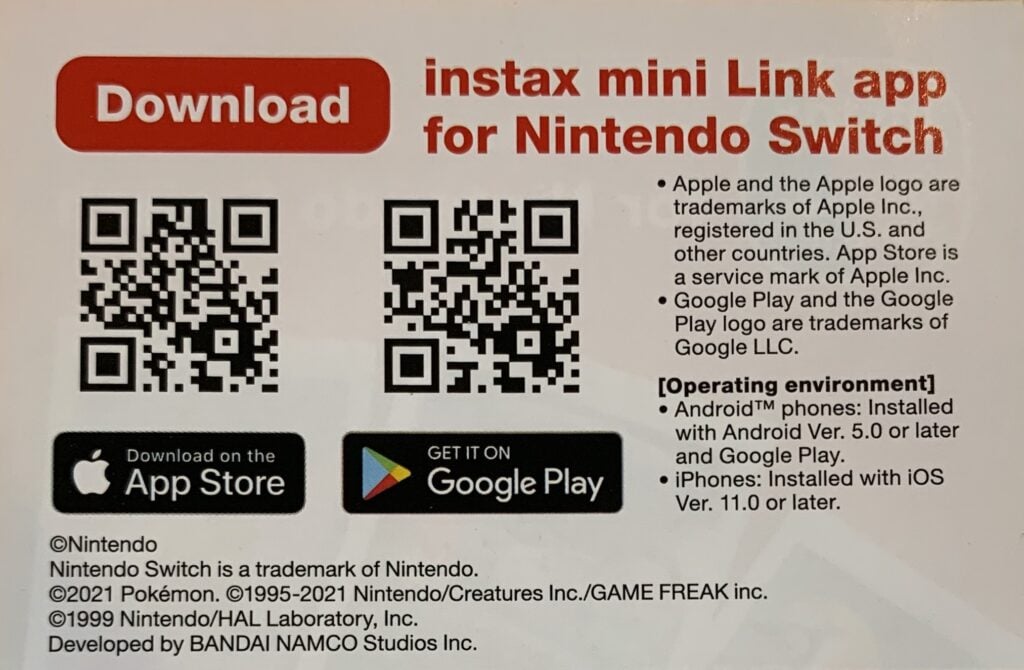
Ready to multitask a few objectives over the next couple of minutes? While your Instax Mini Link is getting juiced up for some instant usage, get your smartphone out — or get ready to open some separate tabs if you are already on one. Download the “instax mini Link app for Nintendo Switch” on your device’s dedicated application store. For quick and easy access to this downloadable necessity, feel free to scan the QR code above to instantly be taken to either the App Store or Google Play pages! For those who have managed to get their hands on the Pikachu Special Edition bundle, the same slip pictured above is included in the packaging!
Step 3: Connect Your Switch to Your Phone and Send Over Screenshots

This is something you will want to do before you connect your Instax Mini Link to your smartphone so that way you will not have to backtrack your steps. Open up your Nintendo Switch and go to your saved photo album. By clicking on any photo and pressing the “A” button you can manage a “Sharing and Editing” menu that will allow you to transfer over photos to your smartphone. Simply press the “Send to Smartphone” option on the menu and then choose between either sending a single screenshot or a batch.
You can transfer up to 10 photos at a time (in other words, an entire film pack) so feel free to get organized for future printing or go crazy! On your smartphone scan the first QR code that appears on your Nintendo Switch with its dedicated camera application and then scan the second one once it appears. It is important to note here that the mobile Instax Mini Link app allows you to print stills from a video so do not be afraid to download some of those either if you have something specific you want to print from that format! Download your screenshots or videos and you are ready for the next step!
Alternatively, you can also instantly get to the editing photo phase within the smartphone app by scanning the Switch QR codes through the “Switch Direct Print” option, however, if you are looking to close your system and do everything on your phone, this is certainly a more practical and time-saving method of doing so. Sending a batch of photos to your smartphone at once and picking out images from your image library is far more convenient than having to scan two QR codes every time you would like to print.
Step 4: Connecting Your Link To Your Phone

It’s almost time to print! While in the smartphone app and holding your Instax Mini Link, press the center button that reads “instax” on the device for over one second — yes literally one second. The device should turn on and now be able to connect to your smartphone through Bluetooth (so be sure that is turned on too). This may take a couple of tries to connect, but the light on the printer should beat blue if it is connecting. To connect to your device for the first time, go to the Bluetooth Settings page which can be found in the top right corner of the application, and click on your device once it says “CONNECT”. Unless there are multiple Instax Mini Links in the area or you are connecting to a brand new printer after previously owning or connecting to another one, your device should be the only unit that shows up.
After your Instax Mini Link and smartphone are connected, the application will fill in some useful details that were previously disclosed at the top of the screen. These details tell you how much battery percentage your Instax mini link still has and how many photos are left to print in the cartridge slot (this number will of course show up as xx/10 as each film pack only comes with 10 photos). If you are ever curious in the future how much film you have left in your printer before needing to replace the cartridge, just check the top of the screen after connecting!
Step 5: Edit Up and Print Out!
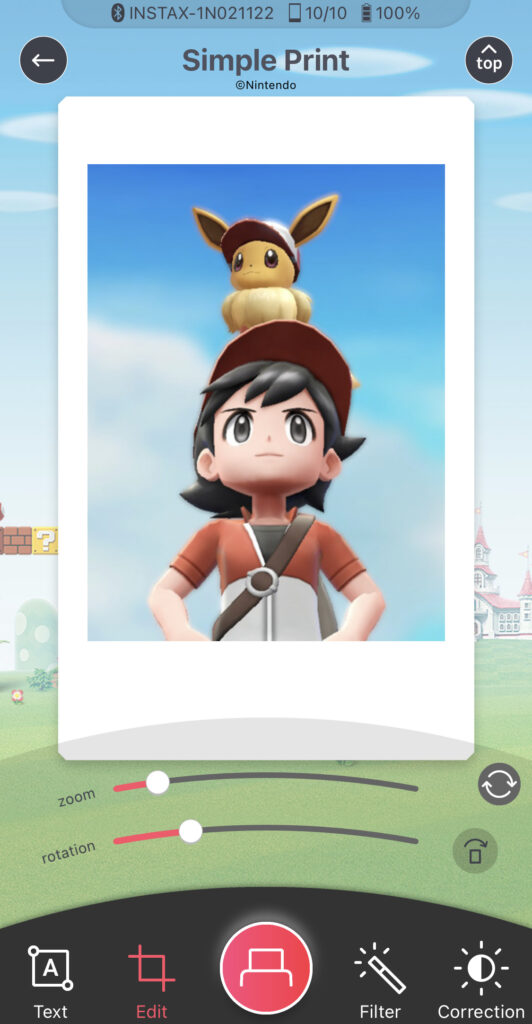
Now that you are connected to your printer and have your screenshots ready, it is time to commence the most important aspect of making instant film: editing and actually printing. Click “Simple Print”, “Video Print”, or even “Instax Camera” to import or take some photos. In the editing phase of making your print, you can change the positioning, lighting, contrast, filter, and various other aspects of your image. When you are ready to print, click the bottom middle icon that represents the Instax Mini Link printing. Your picture will fly upwards on screen to simulate the digital image coming out of the device.
Bonus: Use Some Nintendo-themed Frames and Other Film Packs!
While you can certainly use the regular Instax Mini Link application to do everything but directly connect to the Nintendo Switch, the reason you are on the latest application is to print some screenshots from Nintendo’s games. Why not utilize some Super Mario, Animal Crossing: New Horizons, and New Pokémon Snap frames? In the app under the “Frame Print” section are a variety of Nintendo-themed borders to utilize for your photos. On the home screen of the app, go to the “Frame Print” section and start browsing the available selection!
Note: This is the only way to access the Nintendo-themed filters. Upon choosing a frame, you may begin editing and swap out for a different variation at any time.
Additionally, while the standard white border film is the iconic instant film color, there are plenty of unique Fujifilm Instax Mini Instant Film Packs you can purchase online. From different colors to even character designs featuring Snoopy and Pikachu, there is an entire catalog of Instax Film Packs to pick up both online and in stores at retailers such as Best Buy and Urban Outfitters. Urban Outfitters and Michaels both tend to hold sales on instant film products so be sure to check out their photography sections if you happen to be near one of their stores and are looking to stock up!
Tips For Printing — Do Not Shake!
The printed instant film industry has so many rumors circulating on the internet about how to get the best possible photo quality. As the material and routes of printing have changed over time, one question has always persisted with users: should you actually shake your fresh print until the photo shows and then leave it alone to develop itself? The answer: NO — at least when it comes to the former half of that question.
According to companies such as Fujifilm and Polaroid, shaking your fresh print will not affect its quality at all. Leaving your prints alone in a dark place on a flat surface is the suggested option to seeing the best quality possible come through. Throw your fresh prints in a draw, put them in the back of your jean pockets if you are on the go, just keep it out of the light and leave it alone — and be sure you do not sit on them if they are in your pocket! Do not bend it, do not shake it rapidly, do not flick it around thinking your print will magically develop faster. Be sure not to expose your developing photos to a large array of sunlight and patiently wait for them to develop! It is as easy as that to get the best possible quality!
For those interested in more of Fujifilm’s products you can check out the official website for all things Instax! Now go grab your Nintendo Switch, get photogenic, and get printing!


From Pocket Time-Killers to Console-Quality: How Phones Became Serious Gaming Machines

How Music Is Spearheading the Gaming Industry

Why Montreal is the Video Game Capital of Canada

The Wait Is Over! Solo Leveling’s New Anime Movie Finally Gets an Official First Look

UI vs. The Player: How Clean Design Builds Trust in Gaming

The Quiet Evolution of How We Pay for Games

Blasphemous II: The Third Sin DLC Delivers a Worthy Return to Cvstodia

Batman Is Dead?! DC’s Shocking New Anime Turns the Joker Into Gotham’s Last Hope

One Piece’s Marine Haki Users: Who Really Stands Out?

Makoto Shinkai’s Your Name Gets Official 4K Re-Release for 10th Anniversary

10 Best Underrated Anime Movies Not Made By Studio Ghibli

Why Dice, Cards, and Spins Keep Showing Up in Video Games

The Art of Replayability: What Makes Players Return to the Same Game for Years?
Batman Is Dead?! DC’s Shocking New Anime Turns the Joker Into Gotham’s Last Hope

Sledding Game Launches on Steam and Xbox: A Chaotic Multiplayer Snowsports Experience

Retro Arcade Games Outperform Industry Averages in Early Retention Metrics
-
 Anime4 weeks ago
One Piece’s Marine Haki Users: Who Really Stands Out?
-
 Anime4 weeks ago
Makoto Shinkai’s Your Name Gets Official 4K Re-Release for 10th Anniversary
-
 Anime3 weeks ago
10 Best Underrated Anime Movies Not Made By Studio Ghibli
-
 Features4 weeks ago
Why Dice, Cards, and Spins Keep Showing Up in Video Games
-
 Features4 weeks ago
The Art of Replayability: What Makes Players Return to the Same Game for Years?
-
 Anime1 week ago
Batman Is Dead?! DC’s Shocking New Anime Turns the Joker Into Gotham’s Last Hope
-
 Features3 weeks ago
Sledding Game Launches on Steam and Xbox: A Chaotic Multiplayer Snowsports Experience
-
 Features3 weeks ago
Retro Arcade Games Outperform Industry Averages in Early Retention Metrics
-

 Anime4 weeks ago
Yoriichi Tsugikuni: The Legendary Demon Slayer Who Started It All
-

 Anime2 weeks ago
Why Kusunoki’s Garden of Gods Is More Than Just Another Rural Slice-of-Life Anime
-

 Features3 weeks ago
How Games Like Mina the Hollower Prove There’s Still a Market for Retro Games
-

 Features4 weeks ago
The Most Immersive Football Management Games of All Time